The creation process for “Which Tree to Climb” A diorama for Chute Space at M16 Gallery Griffith, ACT.


“Which Tree to Climb?” a poem
“Which tree to climb?” I asked myself when I came upon the view.
There are so many, both large and small,
I don’t know what to do.
The small one with the rope looks fun but won’t take me very high.
The one with the swing will make my tummy turn, like butterflies swirling inside.
There’s a tall one there, where from underneath,
I can’t even see the sky.
But if I climb the ladder steep, then the branches thick and wide,
Up and up and up I’ll climb and I will be so high.
I’ll see a view, like a dream come true, (breath taking) – I’ll reach out and touch the sky!
Some trees will be easy, some very hard,
Some I’ll fear climbing back down.
But no matter where I go in life,
I know there’ll always be another tree to climb.
by Michaela Laurie
At the Artist Society of Canberra Christmas Market weekend in 2017, I set up my stall next to Kerry Shepherdson. Kerry, along with fellow visual artist Jeffree Skewes, converted the former Griffith, ACT, library book returns-chute into a secure and functioning mini art gallery several years ago. It is linked to the M16 Art space in Griffith, ACT and they have called it Chute Space. This little space, (is it the smallest gallery in the Australia or the world?) measures 18cm (h) x 40cm ![]() x 26cm (d) and is available to view 24 hours a day, 7 days a week. The exhibitions change every 2 weeks.
x 26cm (d) and is available to view 24 hours a day, 7 days a week. The exhibitions change every 2 weeks.

During the Christmas market, Kerry asked me if I would be interested in putting forward a submission to exhibit at Chute Space. She thought my work would work really well as a diorama. I had never thought about turning my landscapes and trees into anything like that. But, when I was much much younger, I had created a diorama out of a shoe box. It had a tiny hole at one end to peep through and a hole in the lid to shine a torch for the light source. I remember it being quite magical. What a shame I don’t have a photo – but that was in almost box brownie camera days.
So what is a diorama? The word diorama can either refer to a 19th-century mobile theatre device, or, in modern usage, a three-dimensional full-size or miniature model, sometimes enclosed in a glass showcase for a museum. Dioramas are often built by hobbyists as part of related hobbies such as military vehicle modelling, miniature figure modelling, or aircraft modelling.
I spent quite a bit of time thinking about how I was going to approach this work. Could I even do it? I wrote a proposal early in 2018 and I was accepted.
Ok. Now I have to make it.

I decided on using core flute board to create a 4 sided box. I took a large sheet and measured up the box size with lead pencil. It had to fit within the chute space at M16 Gallery. I cut through only the top layer of the core flute board to that the side would bend up on 3 sides. This made the box stronger and I didn’t need to tape the 3 bending sides. I cut out 2 rectangles at the top so that when the sides bent, a 3 sided box would be formed. I didn’t tape up the 2 back box sides/corners at this stage.
I began to think about how I was going to create the 3 dimensional layers. Would I create a separate painting for each layer and cut each layer out? That would mean at least 5 separate paintings. I then thought about combining the diorama idea with the craft of Paper Tole. I had seen the fantastic displays at the Papercraft Festival in Penrith by Kevin Menzies at http://www.papertoleteacher.com.au/ Kevin is a master at this century’s old craft. I had never tried it but thought I would try to use some of this crafts techniques in the diorama. Paper tole is a centuries old craft also known as 3 Dimensional Decoupage, and Vu de Optic. It is an interesting craft using minimum 4 or more of the same prints, cutting out specific pieces starting from the background of the picture, moving to the middle-ground then the foreground, after shaping each individual piece then layering the cut pieces using neutral cure silicone to create a 3 dimensional image. If only Kevin lived nearby so I could have taken some classes. So, I did the best I could referring to some YouTube classes along the way. I practiced on a picture which I had created earlier in the year.


I measured up 2 pieces of Arches watercolour board to create my image. I did preliminary drawing to work out the design. One would form the background sky and distant mountain range. The other would be more complex with distant mountains with tree silhouettes. There would be 4 layers of mountains, hills and trees in this section.
Work began with paint, pigment ink pen and then coloured pencil to create the two panels.

These were scanned in two parts, as they were longer than A4 size. I created an A3 document in publisher where I stitched the 2 scans of each image back to form one long image.
I used 300gsm A3 Canson infinity printable watercolour paper. I printed the background twice. I printed the more complex foreground image 4 times. I took smaller sections of trees and mountains and printed these onto 4 sheets of A4 images.
The back of each sheet was painted with Mod Podge sealer to give the paper further stability. Word of caution: let the Mod Podge dry absolutely completely. It is much easier to cut out the images. If the paper is even a little damp, it will rip easily. Removeable sticky tape also does work and causes rips – as you an see here.
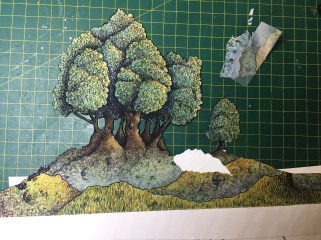
Cut out each layer of the more complex image. Distant hills with tree silhouettes. Next range of hills with distant trees. Etc. Use a very sharp craft knife to cut out see through sections such as between trunks or tree canopy. Take your time. Now cut out extra trees and hill sections which you will place in between the main layers or the diorama.
Also cut out sections of the foreground trees to create 3D layers. Use your finger tips to curve these sections. Attach these sections to the main diorama layer using 3d foam dots or silican glue to raise these sections off the surface.


Use a black a dark pen sharpie pen or dark chalk powder to very carefully shade in all the cut edges. The eye is drawn to the white edge of the paper and it is distracting. This is time consuming and it is easy to slip the pen onto the image.
Use a white, cream, powder blue or powder green pencil to lightly shade the 2 distant layers. This will help make them look as though they are in the distance.

I visited a hobby store and bought balsa wood wedge strips. Cut these to the length of each landscape layer and glue balsa to the bottom edge on the paper. This will make it easier for the paper layers to stand up. Use thin strips of balsawood at the back of tall objects such as trees to make them stand and not bend. The strips need to be anchored with glue to the bottom wedge of balsa wood. The edges can be coloured with black Sharpie pen if they can be seen.
Cut the background paper (mountains and sky) to size and attach this with lots of double sided tape or spray adhesive to the back section of the box. Cut the 2 printed backgrounds to size for the two side panels and attach these the same way.

Paint the base of the core flute box with acrylic paint. I used a mid-brown and then splodges of two different greens. You may wish to create a stream or lake. Allow to dry completely.
Bring the two side panels and the back panel up to form the three sided box. Tape the corners securely with gorilla tape. From top to bottom of these two joins.
You may wish to attach ladders etc. to the trees. Do so at this stage. I found that they were most effective if silhouetted in black. Use PVA to attach to the trees.
Now the fun begins. Delicately place the diorama layers within the box. I left 5cm between the two back layers and 3-4cm between the two front layers. Play around until you are happy. You can use a glass headed pin to secure the balsa wood strip to the core flute base until you are happy with the layout. Take a photo with your phone and mark positions of the layers with a lead pencil.

If you wish to include a gravel path or sand, do so at this stage. Apply PVA glue. Sprinkle on sand or very small gravel and allow it to dry completely. Go outside and tip the box side ways to allow excess sand/gravel to be removed. Repeat gluing if necessary.

Glue the layers of the diorama into place using strong PVA glue to the bottom of the balsa wedge using the pencil marks and your photo reference as a guide.
Curve the extra trees and hill sections so that they will stand without glue and play around with their placement between the main layers of the diorama. Dip the straight edge with PVA and put into place.


Find small rocks and twigs to place into the landscape. Play around until you are happy with their placement. I purchased grass tufts at a model and hobby shop. These are intended for use in model railway scenes. I also purchased miniature animals. Play around with these too and when you are happy PVA then in place. Pour a globe of glue onto a piece of cardboard or firm paper and dip the very edge of these items into the glue.
